
Introduction
Large Language Models (LLMs) are great at answering individual questions, but real-world AI applications rarely consist of a single prompt and a single response. A useful chatbot needs to remember previous messages, decide what to do next, call external tools when necessary, and maintain state throughout a conversation.
Without a framework, these behaviors quickly turn into nested if statements, loops, and custom state management. As the application grows, the code becomes increasingly difficult to maintain.
LangGraph solves this problem by allowing us to model an AI application as a graph. Instead of manually controlling every step of the conversation, we define a set of nodes that perform work, edges that determine how execution flows between those nodes, and a shared state that carries information throughout the graph.
In this article, we'll build a simple chatbot from scratch while learning the core concepts that make LangGraph work.
By the end, you'll understand not only how to build a chatbot, but also why LangGraph is designed the way it is.
Prerequisites
Before starting, make sure you have:
- Python 3.10 or newer
- Basic knowledge of Python functions and classes
- An LLM provider (OpenAI, Ollama, Anthropic, etc.)
- LangChain and LangGraph installed
We'll use Ollama throughout this tutorial, but the overall architecture is identical for other inference engines.
Understanding the Three Core Concepts
Before writing any code, it's important to understand the three building blocks that every LangGraph application consists of.
State
The state is the shared memory of the graph.
Every node receives the current state, performs some work, and returns an update to that state.
Unlike traditional Python programs where functions often modify objects directly, LangGraph nodes return only the changes they want to make. LangGraph then merges those changes into the shared state.
You can think of the state as a notebook that every node is allowed to read from. Instead of erasing the notebook, each node simply writes new information into it.
For a chatbot, the state usually contains the conversation history.
Nodes
A node is simply a Python function.
Its job is to perform one specific task.
Some examples include:
- Asking an LLM to generate a response.
- Calling an external tool.
- Searching a database.
- Retrieving documents from a vector store.
- Summarizing previous messages.
Every node follows the same basic idea:
- Read the current state.
- Perform some work.
- Return an update to the state.
This simple interface makes nodes easy to understand and reuse.
Edges
Edges define how execution moves through the graph.
There are two kinds of edges.
A normal edge always moves execution to the next node.
For example:
START → Chatbot → END
A conditional edge allows the graph to make a decision.
For example, after the chatbot generates a response, the graph can decide:
- Finish the conversation.
- Call a tool.
- Ask another model.
- Continue processing.
This ability to make decisions is what allows LangGraph to build complex AI workflows while keeping the code organized.
Implementing Our First Chatbot
Now it's time to turn the concepts from the previous section into working code.
Although the program is fewer than 40 lines long, it contains every fundamental component of a LangGraph application:
- A state that stores information shared across the graph.
- A node that performs work.
- A graph that connects the nodes together.
- A checkpointer that remembers conversations.
- An execution loop that sends user messages into the graph.
Let's examine each piece one at a time.
Step 1: Defining the Graph State
The first thing every LangGraph application needs is a state.
from typing import Annotated
from typing_extensions import TypedDict
from langchain_core.messages import BaseMessage
from langgraph.graph.message import add_messages
class State(TypedDict):
  messages: Annotated[list[BaseMessage], add_messages]
The state is the shared memory of the graph.
Every node receives the current state as input and returns changes that should be merged back into it.
In our chatbot, the state contains only one field:
messages
which stores the entire conversation.
Notice that the field is wrapped in Annotated.
Annotated[list[BaseMessage], add_messages] This is one of the most important lines in the entire program.
Normally, when a node returns a value for a field, LangGraph replaces the previous value. For example, if a node returned:
{"messages": [response]} the old conversation would disappear.
The add_messages function changes this behavior. Instead of replacing the list, LangGraph appends the new messages to the existing conversation.
Without add_messages, the chatbot would forget everything after every turn.
Step 2: Creating the Language Model
Next, we create the language model.
from langchain.chat_models import init_chat_model
llm = init_chat_model( "llama3.2:1b", model_provider="ollama", )
init_chat_model() creates a chat model that LangChain knows how to communicate with.
Although we're using Ollama in this tutorial, the rest of the code would remain almost identical if you switched to OpenAI, Anthropic, or another supported provider. One of the advantages of LangChain is that it provides a common interface for many different language models.
Step 3: Writing the Chatbot Node
Now we can create our first node.
def chatbot(state: State):
  response = llm.invoke(state["messages"])
return { "messages": [response] }
Remember that a node is just a Python function.
It receives the current state as input.
state["messages"] contains the complete conversation up to this point.
The node sends those messages to the language model.
response = llm.invoke(state["messages"])The model generates a reply, which is returned as an AIMessage.
Finally, the node returns:
{ "messages": [response] } Notice that the node does not modify the existing state directly.
Instead, it returns only the new information it wants to add.
LangGraph is responsible for merging that update into the shared state.
Because we configured the messages field with add_messages, the new AI response is appended to the conversation instead of replacing it.
This separation between reading state and returning updates is one of the core design principles of LangGraph.
Step 4: Building the Graph
Now that we have a node, we can build the graph itself.
builder = StateGraph(State)
builder.add_node("chatbot", chatbot)
builder.add_edge(START, "chatbot")
builder.add_edge("chatbot", END)
The first line creates a graph whose shared state is defined by our State class.
builder = StateGraph(State)Next, we register the chatbot function as a node.
builder.add_node("chatbot", chatbot) The first argument is the node's name inside the graph, while the second argument is the Python function that should be executed.
Finally, we connect the nodes together:
START → chatbot → END
Graphically, the workflow looks like this:
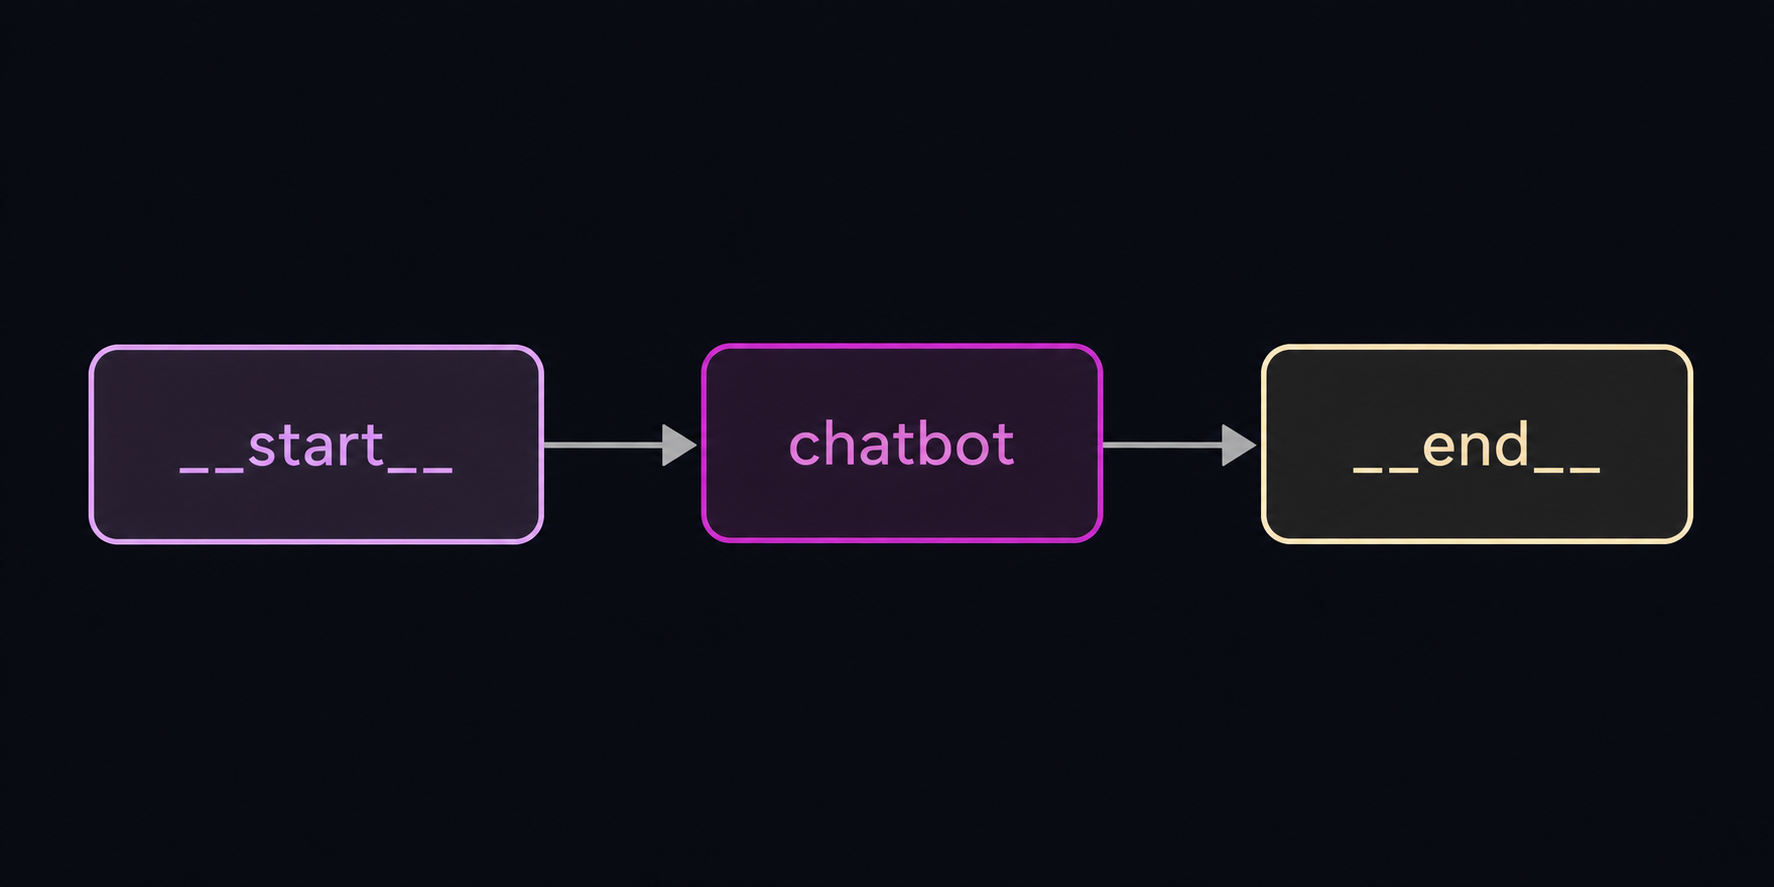
Although this graph contains only one node, larger applications follow exactly the same pattern. The only difference is that they contain more nodes and more complex routing logic.
Step 5: Adding Memory
Next, we add memory to our chatbot.
from langgraph.checkpoint.memory import InMemorySaver
checkpointer = InMemorySaver()
graph = builder.compile( checkpointer=checkpointer)
Without a checkpointer, every call to the graph would be treated as a completely new conversation.
The checkpointer stores the graph's state after each execution and restores it the next time the same conversation continues.
In this example, we use InMemorySaver, which keeps everything in the program's memory.
This is perfect for learning and testing, but because the data is stored only in RAM, all conversations are lost when the program exits.
For production applications, LangGraph also supports persistent checkpointers backed by databases such as PostgreSQL or SQLite.
Step 6: Identifying a Conversation
Since the checkpointer can store multiple conversations, LangGraph needs a way to know which one to load.
That's the purpose of the configuration object.
config = { "configurable": { "thread_id": "thread-1" } } The thread_id acts as the conversation's unique identifier.
Whenever the graph is invoked with the same thread_id, LangGraph restores the previously saved state and continues the conversation from where it left off.
If a different thread_id is used, LangGraph starts a completely new conversation.
You can think of the thread_id as a chat session ID.
Step 7: Running the Graph
Finally, we create a simple chat loop.
while True:
    user_input = input("You: ")

    if user_input.lower() in {"quit", "exit"}:
        break

    result = graph.invoke(
        {
            "messages": [{"role": "user","content": user_input,}],
        },
        config=config
    )

    print("AI:", result["messages"][-1].content)
Each iteration performs the following steps:
- Read the user's input.
- Wrap it in a message object.
- Invoke the graph.
- Restore the previous conversation using the thread_id.
- Execute the graph (START → chatbot → END).
- Save the updated state.
- Return the final state.
- Print the model's response.
Notice that we pass only the new user message to graph.invoke(). We do not manually resend the entire conversation history. The checkpointer automatically restores the previous messages before the graph runs, and after execution it saves the updated state again.
This is one of the key differences between using LangGraph directly and managing conversation history yourself: the graph handles state restoration and persistence for you, leaving your application code focused on the workflow itself.